 I finally came around to the "metallic finish" devotee side of the tacky vs. fabulous argument after pics on Pinterest showed me the light. I found myself a sweet little dresser at a local thrift store for $19.99 and cleaned out a workspace in the garage. After much blog-browsing and youtubing, I ordered gilding supplies from ebay and made a trip to the big orange store for cheap brushes and primer. Tips and lessons learned accompany each pic from the process of taking the Plain-Jane dresser to spectacular. Thanks to Little Green Notebook and Elegantly Done for their tutorials.
Materials Used:
Gripper Primer in grey. Available at Home Depot. Made by Glidden.
Rolco Size: Quick Dry Oil Base 8oz Purchased from ebay store
Aluminum leaf: Ordered from same ebay store Thought I'd need about 100 sheets, but I ended up using twice that because I had to redo several sections. More on that later.
Minwax Polycrylic Topcoat: Satin
Foam Brushes, cheap bristle brushes, small roller
Antiquing Glaze: hobby/craft store
Rub-n-Buff: Silver Leaf hobby/craft store
 This is how the dresser started out. Sweet, simple, and in very good condition.
.jpg) |
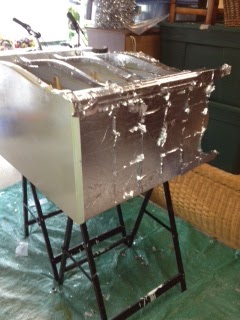
I wore latex gloves when I applied the leafing. It helped alot. I had read that the oils and moisture on your fingertips can be a problem. I had no issues and the leafing didn't stick to me. I could even cut them in half for legs and trim and such. Cutting several at a time keeping the tissue paper between the sheets worked the best. It went on pretty easily, but any breeze caused it to tear or go off kilter. I ended up closing the garage door and suffocating a little. There were two recommended methods of leafing. One said to lay all the sheets and then burnish, and the other said to do one leaf completely before moving on to the next. Because the size was drying faster than anticipated and the open time was going to fall way short, I opted for the lay-them-all method.
I used a blush brush to burnish....fancy talk for rubbing smooth...the leaf. The excess went all over, but cleaned up easily with the vacuum. Next time I think I'll try to save it for another type of project.
Because the size dried faster than I had planned for, some of my areas didn't turn out very well. So I waited a day, reapplied the size to those areas, and re-leafed. This time I didn't wait quite long enough and the size magically appeared on top of the leafing and got all gummy. Ugh! I also ran out of leaf but still had some sections ready and waiting all sized up. Double ugh! I hunted around on the floor for larger pieces of excess flake to apply over the ready-and-waiting areas. That helped cover the worst of the not-so-great sections. But with the gummy places and the size-y places, the dresser looked awful. I wanted to cry. It had had such promise just an hour earlier.
I figured it was so far gone that I couldn't ruin it much further, so I grabbed the mineral spirits and using a soft rag, started to wipe down the gummy/size-y areas. And it worked ! 15 minutes later my dresser had been resuscitated! Yay!


I decided that I wanted a little more depth added, so I did a light rubbing with antiquing glaze. I also wiped the glaze on the brassy handles. Then I used silver leaf Rub-n-Buff on the handles and on some leafless spots on the dresser that needed a little camouflage.

I am eager to try another leafing project. Before we hauled the dresser up to my away-at-school daughter's room, we tried it our in place of a drop leaf table in the front entryway. It looked pretty awesome. My husband even suggested that we keep it there instead. Who knew he would like a little glam front and center? Back to the thrift store I go!